리눅스 원격 관리(텔넷 서버, SSH 서버) / APM
기본 구성
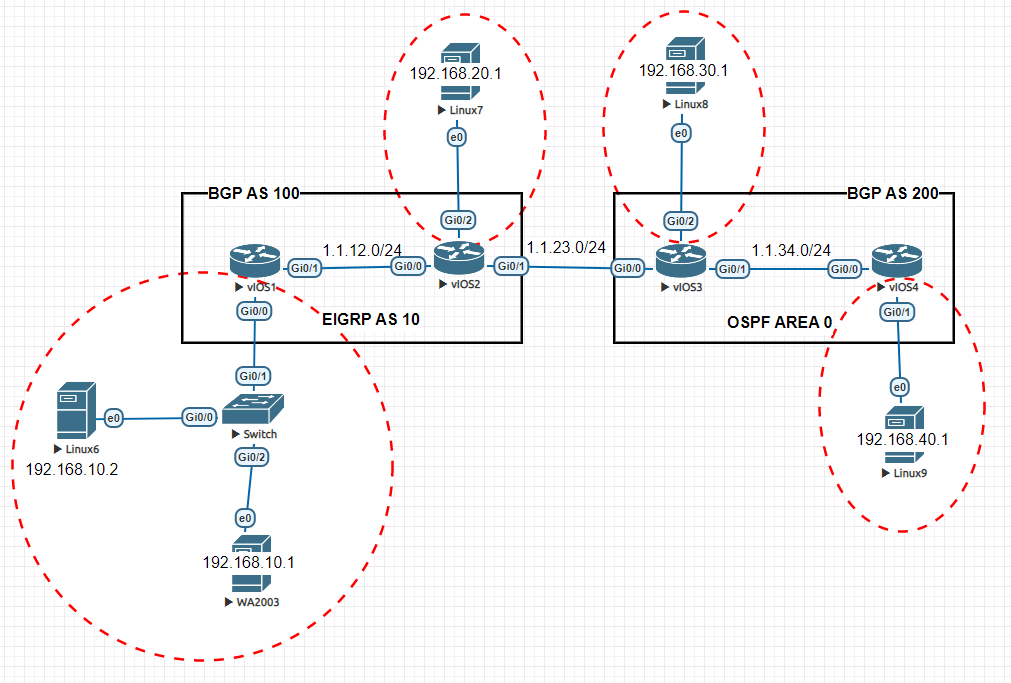
텔넷 서버
| 내용 | 설명 |
|---|---|
| 속도 | 빠름 |
| 그래픽 지원 | 지원 안 함 |
| 보안 | 취약 |
| 사용 가능 명령어 | 텍스트 모드의 명령어만 사용 |
| 클라이언트 프로그램 | 대개의 OS가 기본적으로 가지고 있음 |
- 텔넷 서버 설치
# rpm -qa telnet-server
# yum -y install telnet-server
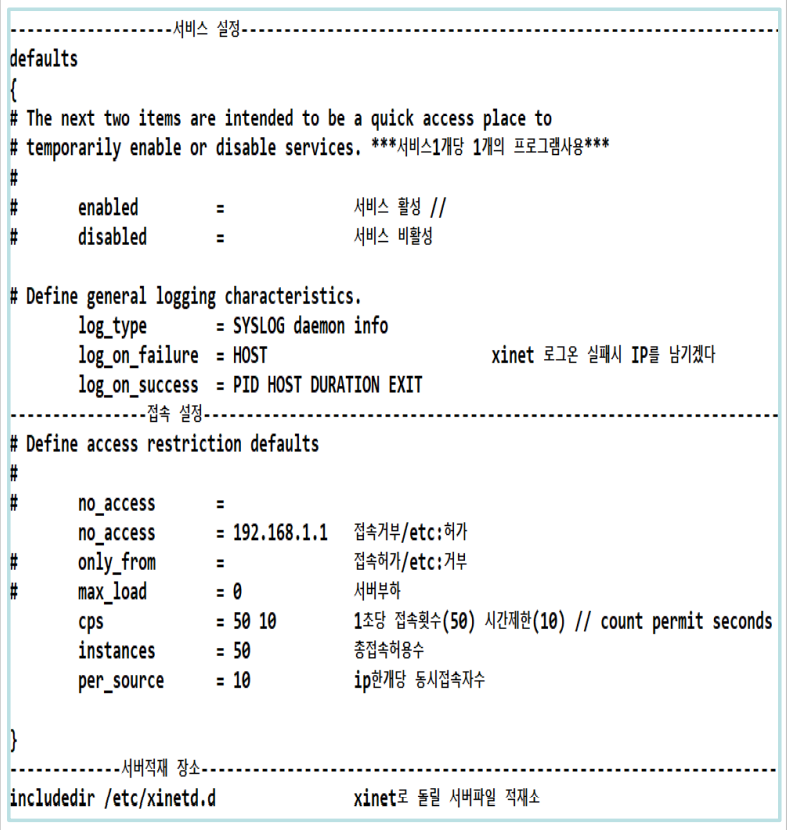
- 설정 파일 변경
# vi /etc/xinetd.d/telnet
    disable=no
- xinetd 데몬 재시작
# service xinetd restart
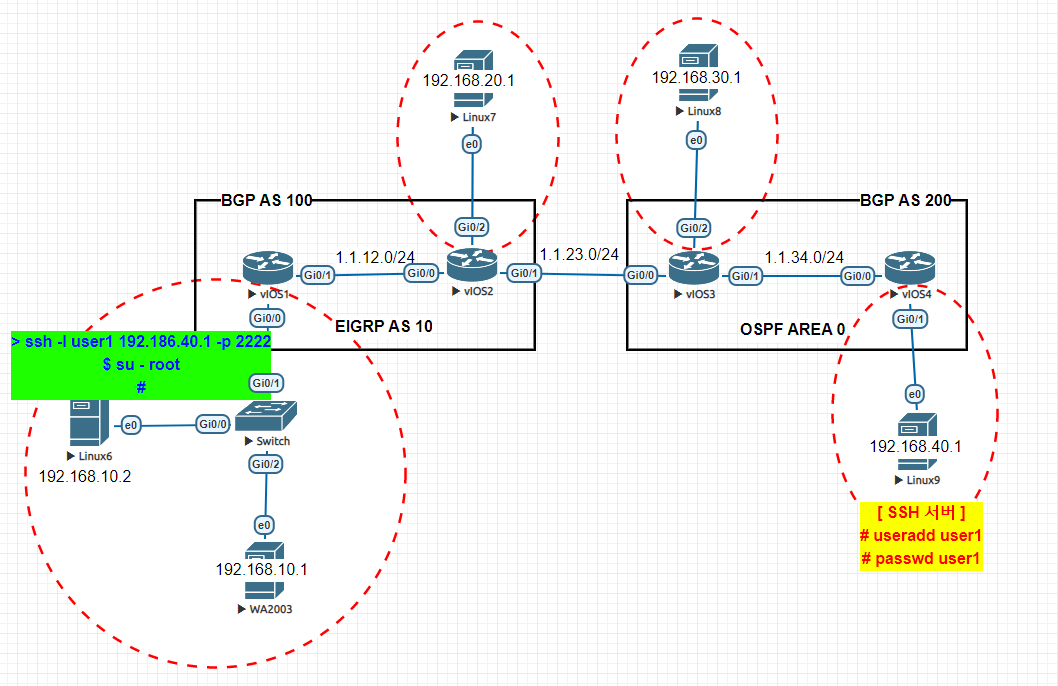
- 텔넷 전용 사용자 생성
useradd user1
passwd user1
클라이언트에서 접속
참고) root 계정 로그인 할 수 있도록 구성
# mv /etc/securetty /etc/securetty.bak
# cd /etc/xinetd.d/

# vi telnet
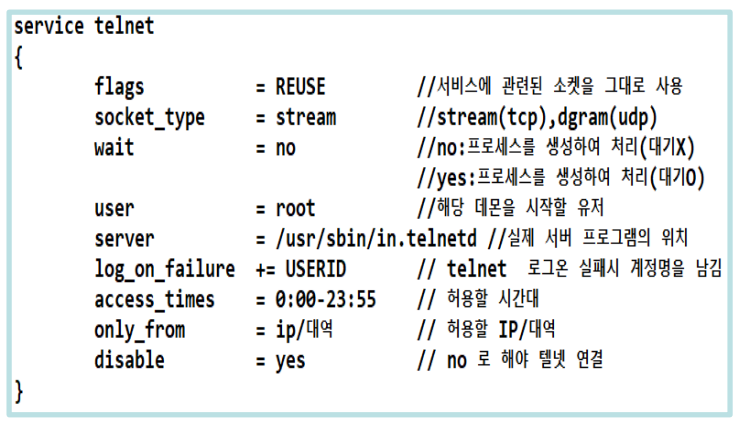
# vi /etc/xinetd.conf
Ex. Telnet 서버
방법
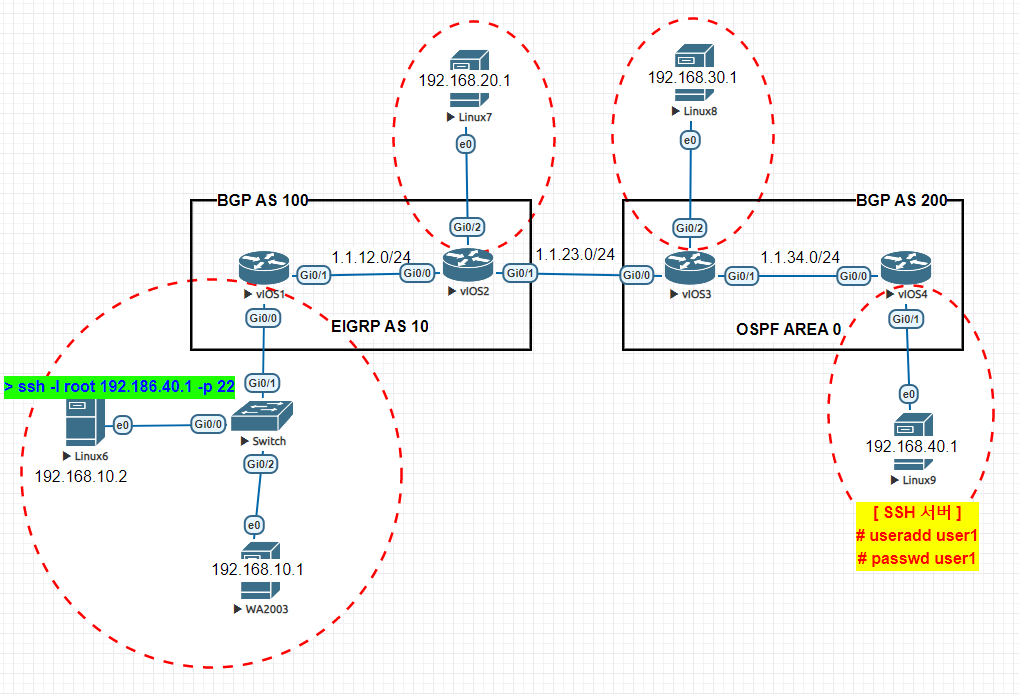
Linux9)
# mount /dev/cdrom /cdrom

# rpm -qa telnet-server
# yum -y install telnet-server

# vi /etc/xinetd.d/telnet
    disable=no

# service xinetd restart

# useradd user1
# passwd user1

# mv /etc/securetty /etc/securetty.bak
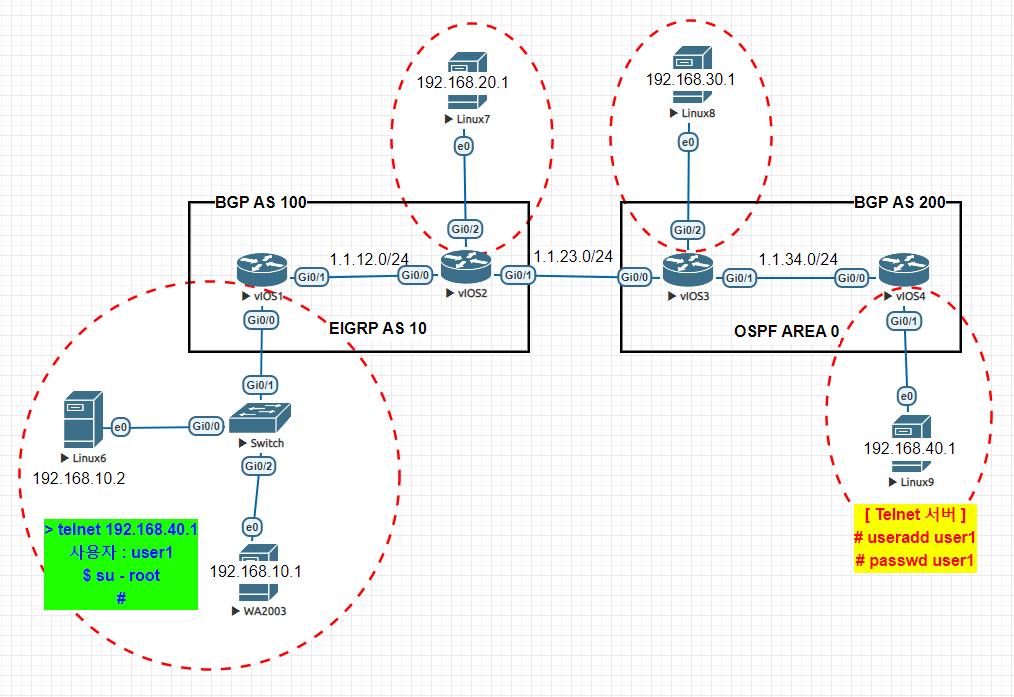
결과
> telnet 192.168.40.1
사용자 : user1
password : 1
$ su - root
# exit
$ exit
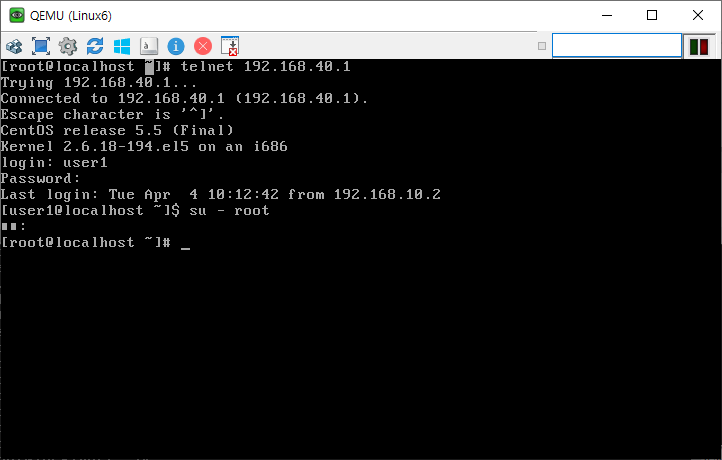
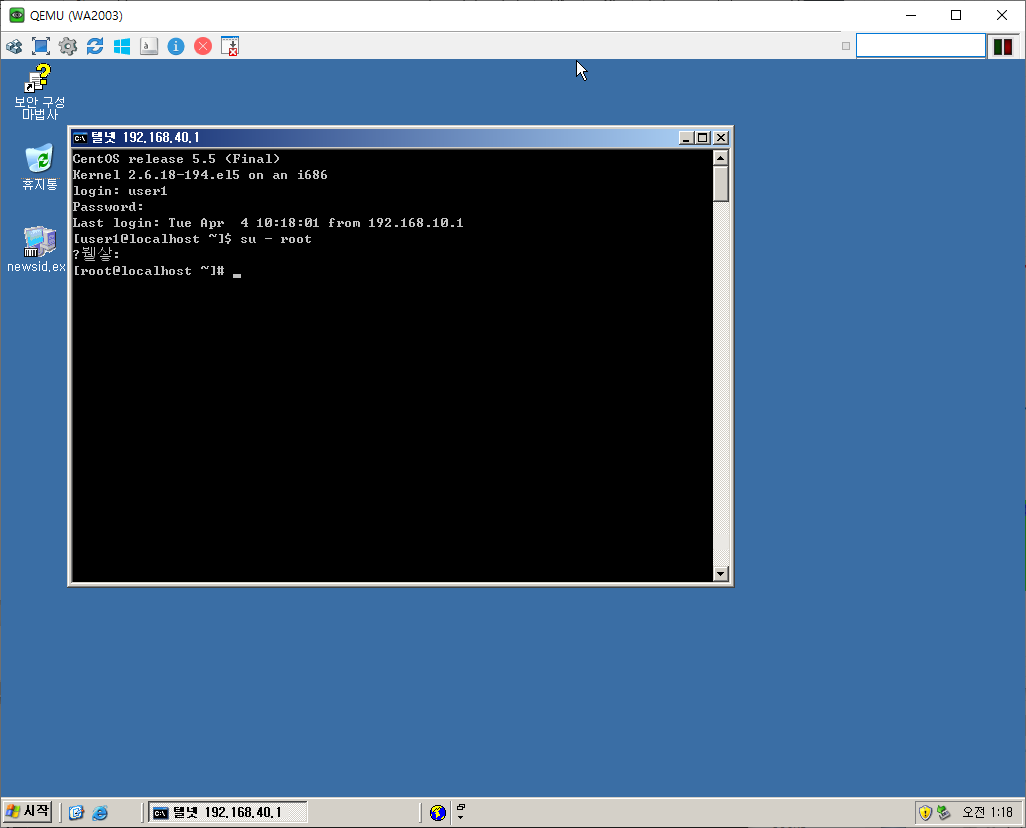
리눅스, 윈도우 2003 둘 다 telnet 40.1 로 접근이 잘 되는 것을 확인할 수 있다.


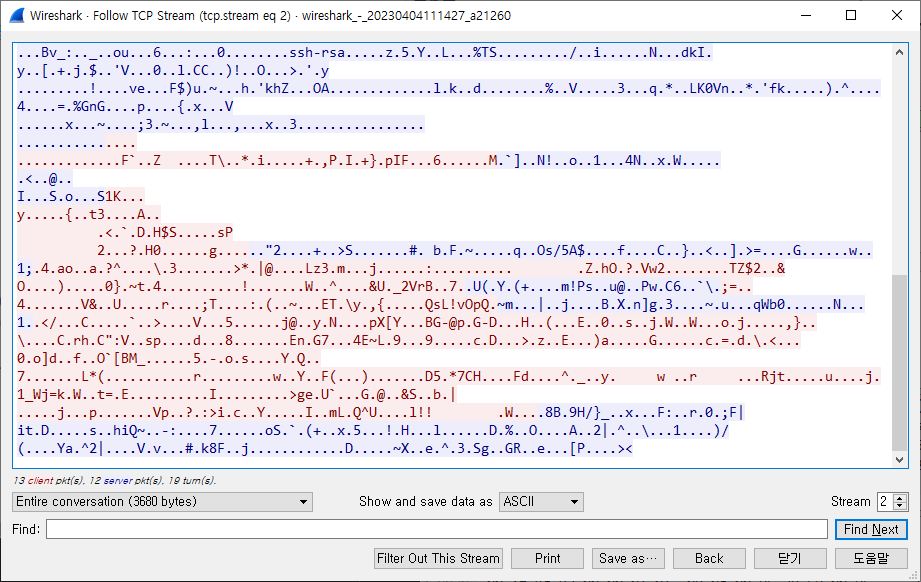
- Wireshark를 키고 telnet 192.168.40.1로 접근했을 경우,
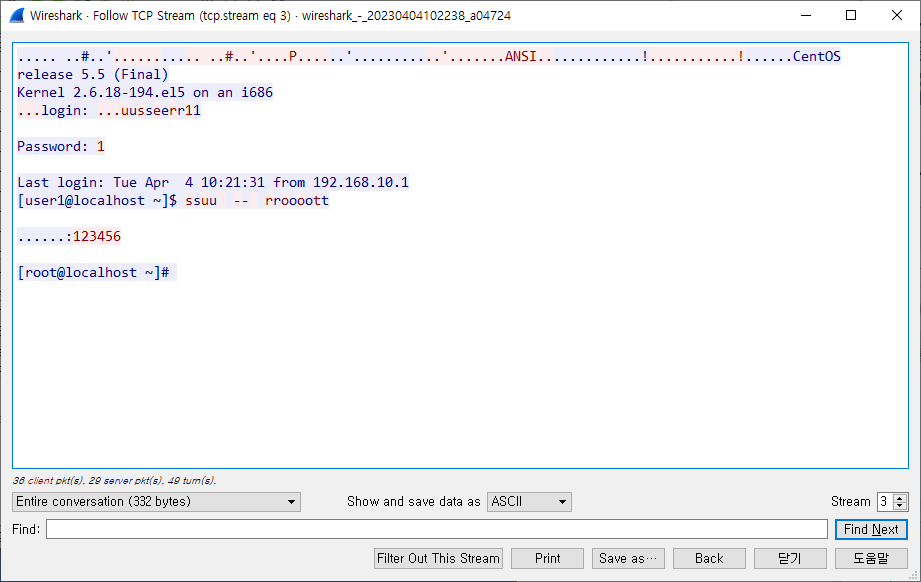
user1, root 비밀번호가 보이는 것을 확인할 수 있다.
SSH 서버
서버
# yum –y install openssh-server openssh-clients openssh-askpass
- sshd 서비스 포트변경 ( 22 -> 2222 ) 및 root 로그인 막기

# vi /etc/ssh/sshd_config
Port 2222
PermitRootLogin no

# /etc/init.d/sshd restart

# ps -ef | grep sshd
root 00000 1 0 09:05 ? 00:00:00 /usr/sbin/sshd
root 00000 16871 0 09:15 pts/0 00:00:00 grep sshd
클라이언트
# ssh -l root IP주소 -p 2222
Ex. SSH 서버
방법
Linux9)
# yum -y install openssh-server openssh-clients openssh-askpass

# vi /etc/ssh/sshd_config
-> 아무것도 안 바꿔도 됨.

# /etc/init.d/sshd restart

# ps -ef | grep sshd
결과
Linux6)
# ssh -l root 192.168.40.1 p 22
Wireshark 에서 ssh를 검색해보면
비밀번호가 보이지 않는다.
-> 보안상 Telnet 서버 보다는 강하다는 뜻.
Ex. 포트 번호 2222 + root 로그인 막기
방법
Linux9)
# vi /etc/ssh/sshd_config
    Port 2222
    PermitRootLogin no

# /etc/init.d/sshd restart
결과
Linux6)
> ssh -l user1 192.168.40.1 -p 2222
$ su - root
#

APM
- Apache, PHP, MySQL
아파치 설치 및 구성
# yum -y install httpd
# service httpd restart

# cd /var/www/html
# vi index.html
    아무내용 쓰기

# service httpd restart
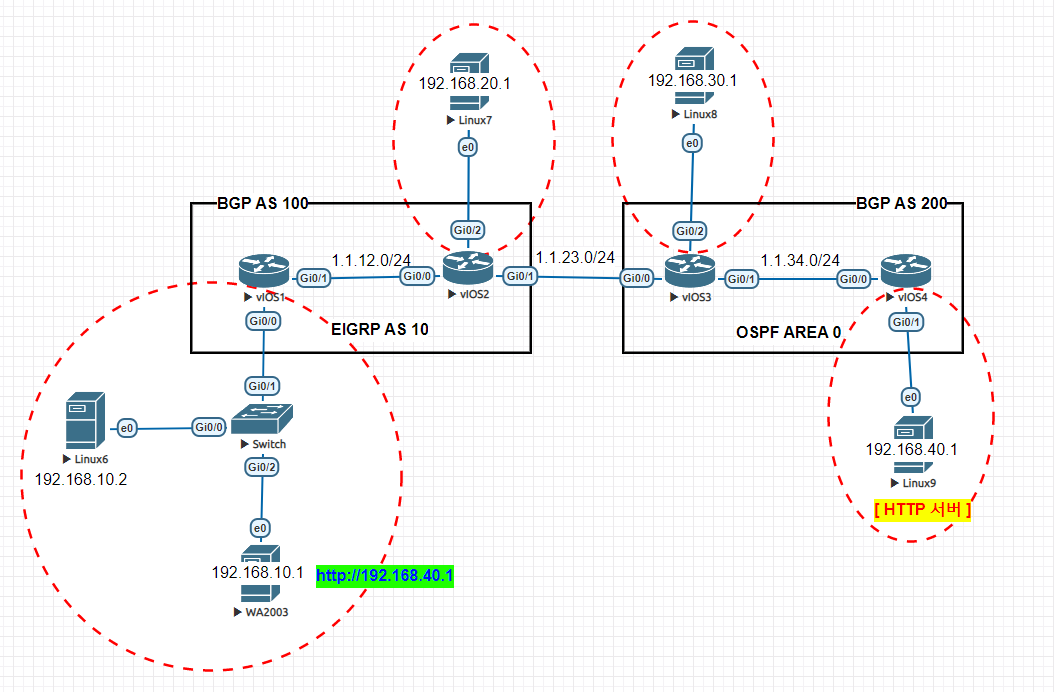
가상 호스트
- 아파치가 가상으로 복수 개의 웹 주소나 IP 주소에 대해서 서비스 하도록 설정하는 기능.
- 이름 기반의 가상 호스트
- 도메인 네임으로 서비스할 가상 호스트를 결정.
- DNS 서버가 각 호스트명이 올바른 IP 주소로 대응하도록 가상 호스트를 설정하고, 다른 호스트명을 구별할 수 있도록 아파치 웹 서버를 설정하기만 하면 됨.
- 도메인 네임으로 서비스할 가상 호스트를 결정.
# mkdir -p /var/www/v1
# mkdir -p /var/www/v2
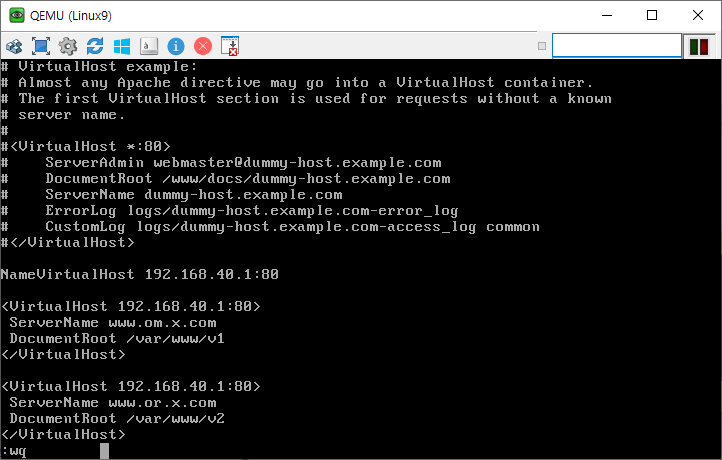
# vi /etc/httpd/conf/httpd.conf
- 마지막에 추가 -
NameVirtualHost 1.1.1.1:80
<VirtualHost 1.1.1.1:80>
ServerName www.om.x.com
DocumentRoot /var/www/v1
</VirtualHost>
<VirtualHost 1.1.1.1:80>
ServerName www.or.x.com
DocumentRoot /var/www/v2
</VirtualHost>
Ex. 가상 호스트
- 방법
Linux9)
# mkdir -p /var/www/v1
# mkdir -p /var/www/v2
# cd /var/www/v1
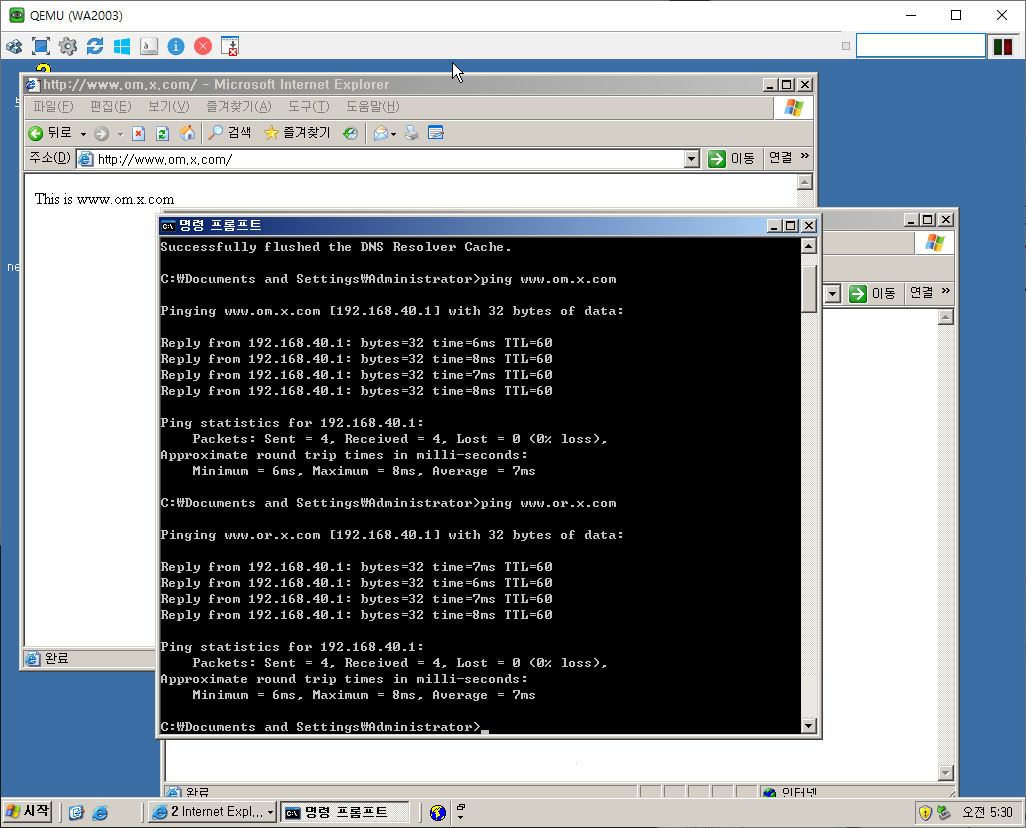
# vi index.html
This is www.om.x.com
# cd /var/www/v2
# vi index.html
This is www.or.x.com
# service httpd restart
# vi /etc/httpd/conf/httpd.conf
- 마지막에 추가 -
NameVirtualHost 192.168.40.1:80
<VirtualHost 192.168.40.1:80>
ServerName www.om.x.com
DocumentRoot /var/www/v1
</VirtualHost>
<VirtualHost 192.168.40.1:80>
ServerName www.or.x.com
DocumentRoot /var/www/v2
</VirtualHost>
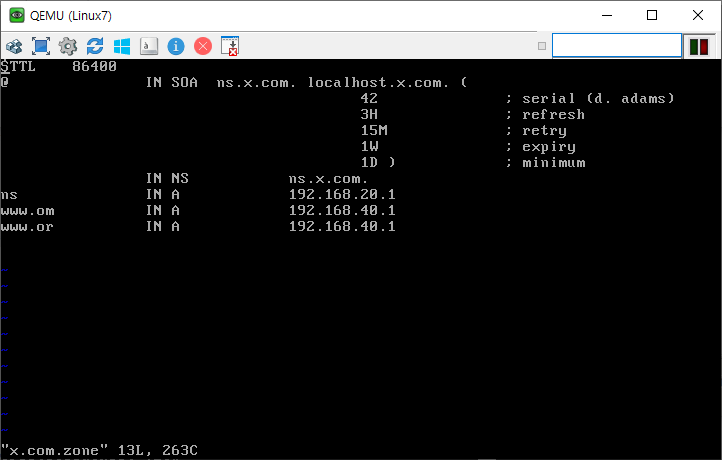
Linux7)
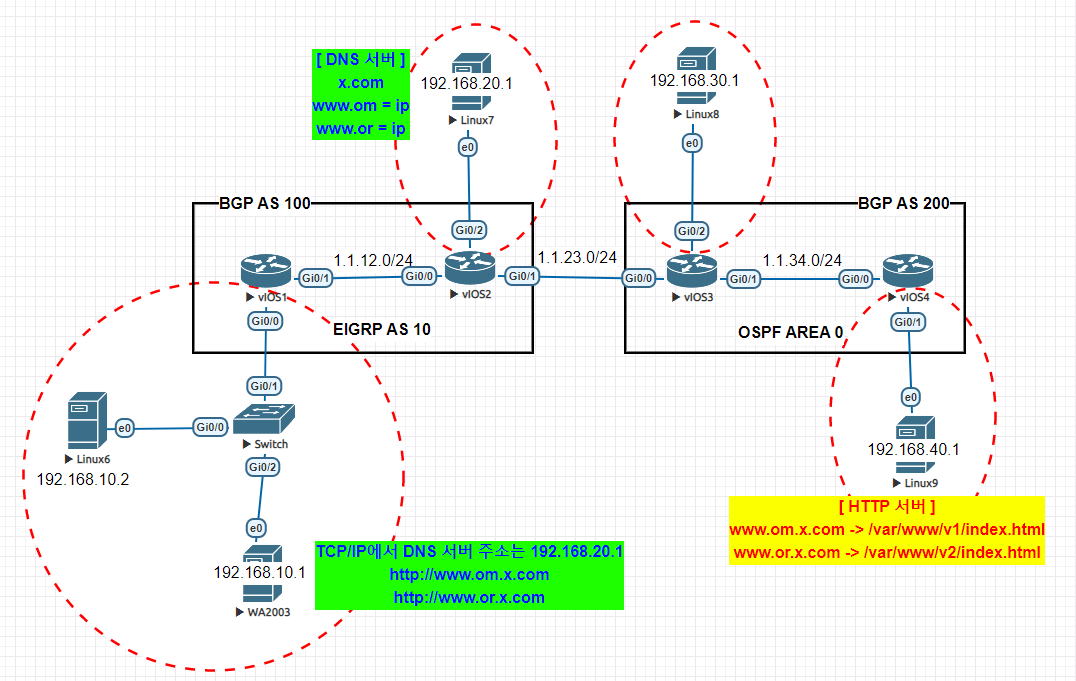
# chown root.named x.com.*
# chmod 777 x.com.*
# service named restart
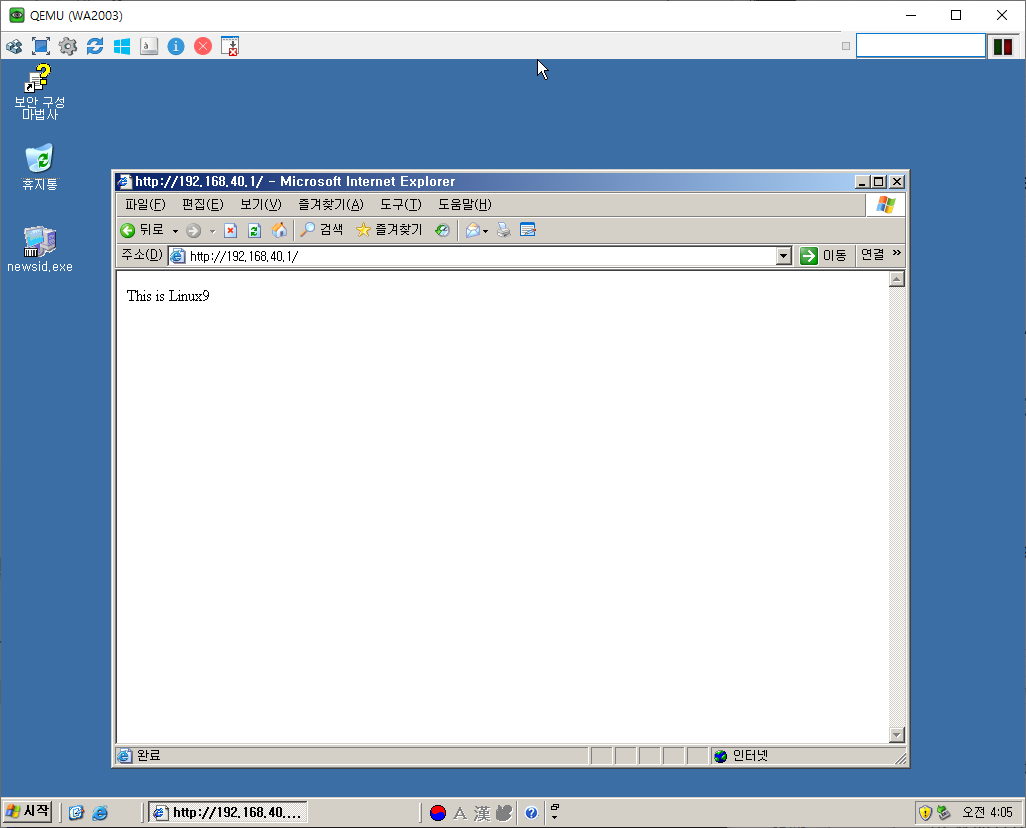
- 결과
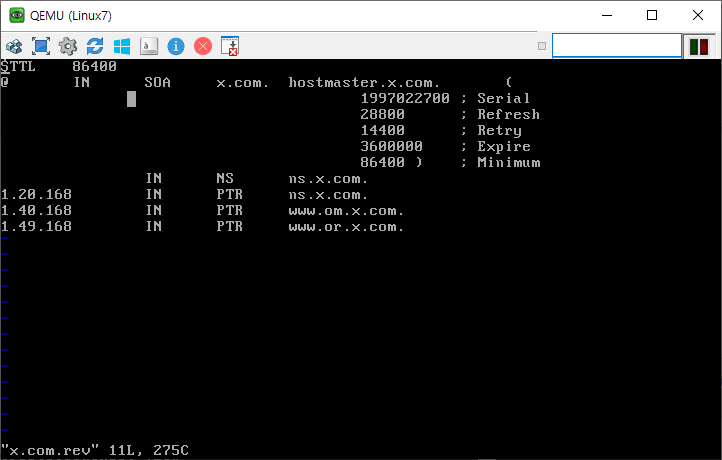
192.168.40.1이 돌아온다.
사용자 인증
Step 01. httpd.conf 수정하기
# vi /etc/httpd/conf/httpd.conf

<Directory "/var/www/html">
Options Indexes FollowSymLinks MultiViews (320행)
AllowOverride All (327행)
Order allow,deny
Allow from all
</Directory>


# service httpd restart
Step 02. 아파치 인증을 적용할 디렉터리에 .htaccess 파일 만들기
# mkdir /var/www/html/admin
# cd /var/www/html/admin

# vi .htaccess
AuthType Basic
AuthName "users login"
AuthUserFile /var/www/.htrootman
Require valid-user
Step 03. 사용자 추가 하기
: 절대 2번째 사용자 등록부터는 -c 옵션을 쓰면 안된다.
-c 옵션을 쓸 경우 전에 있던 파일은 날라가고 새로운 파일이 만들어 지기 때문이다.
# cd /usr/bin
# ./htpasswd -c /var/www/.htrootman user1
#./htpasswd /var/www/.htrootman user2
# more /var/www/.htrootman

# service httpd restart
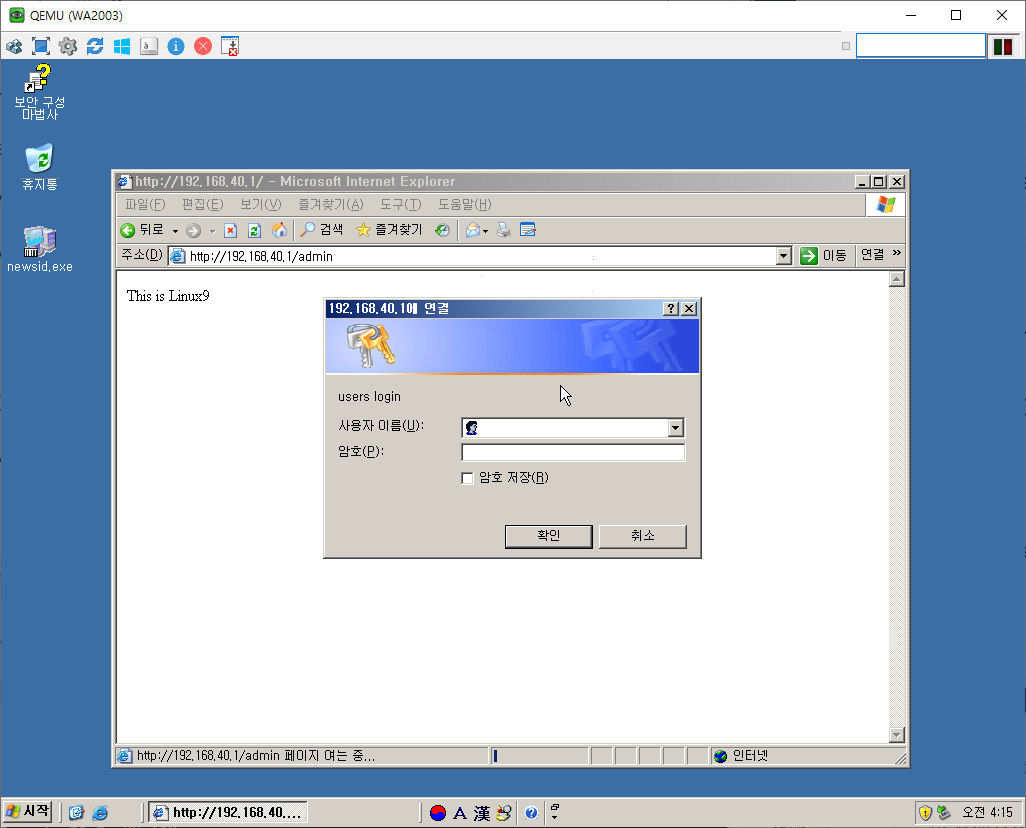
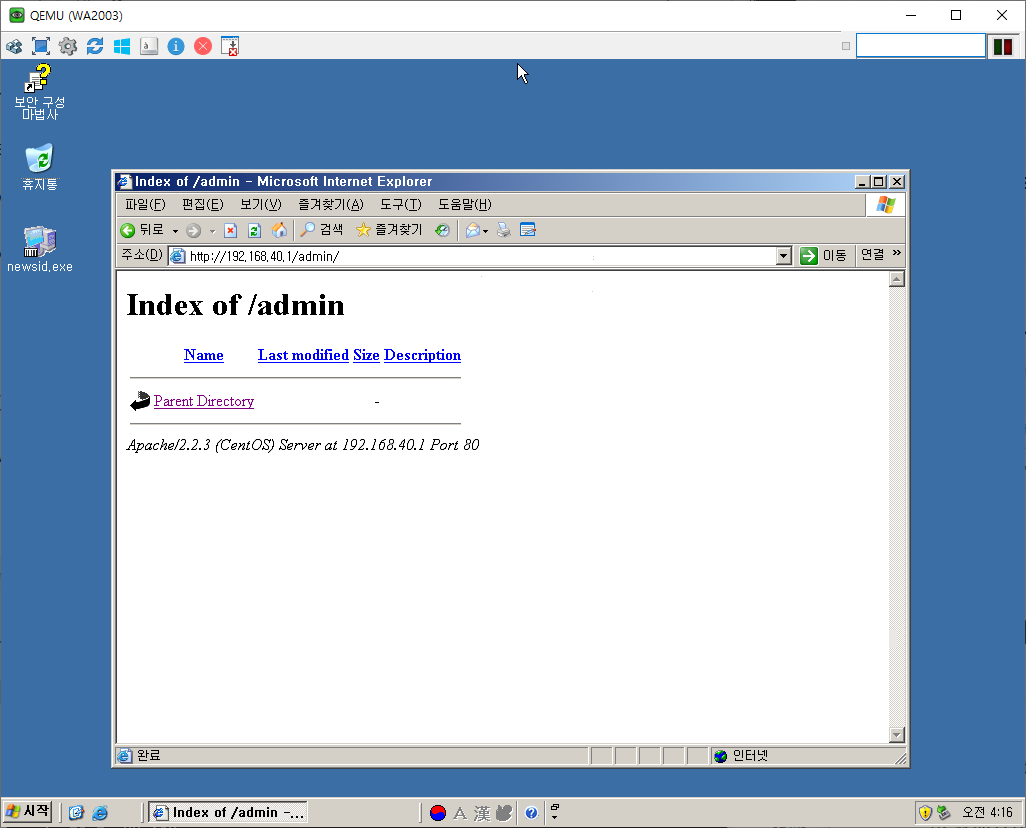
Step 04. 아파치 서버 접근하기
http://www.x.com/admin

사용자 인증이 뜨는 것을 확인할 수 있다.
user1로 들어 왔을 때.
MySQL 관련 명령어
# yum -y install mysql-server
# yum -y install mysql
# service mysqld restart
1. 접속 끊기
> quit (exit, Ctrl + D)
2. 접속 하기
my sql [옵션] [사용할유]
# mysql -u root -p
# mysql -h 호스트 -u root -p
- 옵션이 없는 경우 기본값은 아래와 같음.
-h localhost
-u 현재 접속된 사용자
3. 테이블 구성하기
# mysql

> create database first;

> use first;

> create table first_table(
->name varchar(20),
->age int(3)
->);

> show tables;
> desc first_table;

> insert into first_table(name, age) values(‘a', 23);
> select * from first_table;

> update first_table set age=28 where name=‘a';
> select * from first_table;

> delete from first_table where name=‘a';
> select * from first_table;
4. root 패스워드 변경하기
> use mysql;
> update user set password=password(‘1’) where user=‘root’;
> flush privileges;
> quit;

# mysql --→ 에러
# mysql -u root -p -→ 성공
참고
- 리눅스에 있는 파일을 mysql에서 실행하기
# mkdir /dir1
# cd /dir1

# vi 1.sql
create database it;
use it;
create table t1(id int(5), name varchar(30));
insert into t1 values(1,'a');
insert into t1 values(2,'b');
insert into t1 values(3,'c');
insert into t1 values(4,'d');

# mysql -u root -p
mysql> source /dir1/1.sql
mysql> select * from t1;
Ex.
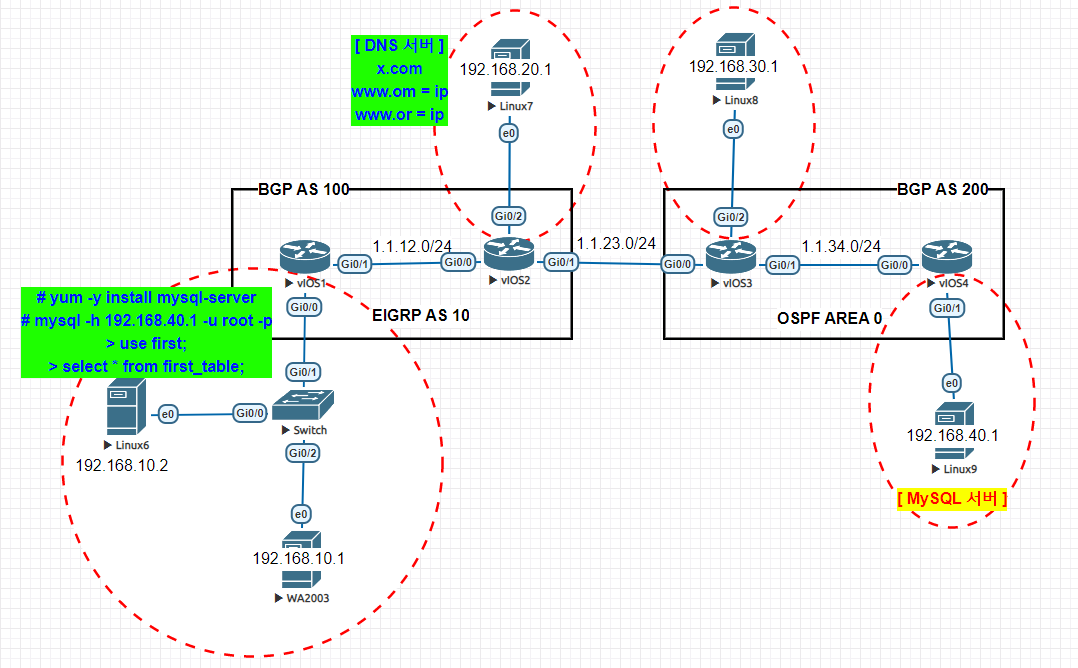
- 결과) 접근되지 않는다.

- 접근 되게 하는 방법
Linux9)
# mysql -u root -p
> create user user1@'192.168.10.2' identified by '1234';
> grant all privileges on *.* to user1@'192.168.10.2';
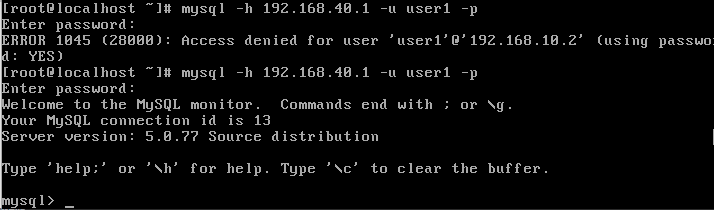
mysql로 잘 접근이 되는 것을 확인할 수 있다.
APM
- Apache + PHP + MySQL
- APM은 Apache PHP MariaDB/MySQL의 약자로 웹 서버를 구축하고
- PHP로 작성된 웹 어플리케이션을 구동하기 위해 이전부터 많이 사용해 온 스택
- XE : 게시판 오픈 소스로 유명한 제로 보드가 발전된 형태